Просмотр новости
Найдите то, что Вас интересует
 Спутники
 РН
РН SpaceX
 Роскосмос
 NASA
NASA
СпутникиРНSpaceXРоскосмосNASA
Who needs a computer or expensive software like Adobe Lightroom? You can edit pictures like a pro, right on your iPhone.
(via Cult of Mac - Your source for the latest Apple news, rumors, analysis, reviews, how-tos and deals.)
Who needs a computer or expensive photo editing software like Adobe Lightroom? You can edit pictures right on your iPhone with Apple’s free, built-in tools.
The Photos app comes with a ton of professional editing tools baked into it. If you didn’t line your shot up quite right, you can fix the crop and perspective. If you took it a split second too late, you can use Live Photo functionality to replace the shot. You can add a Portrait mode blur after the fact, and even change which part of the image is in focus.
Here are the eight great editing tools built right into your iPhone.
Taking the perfect picture on the first and only try is a rare occurrence. That picture you hang up on the wall or use as your profile photo for years is often one among 10 or 20 similar-but-not-quite-as-good shots.
And, in the era of digital photography, you don’t need to fire off multiple frames (and pay to get the film developed) to achieve perfection. You can rely on your iPhone camera, its built-in editing tools and a bit of “computational photography mad science” to make things shine.
If you want to elevate an unremarkable picture to all-timer status, you probably just need to do a little cleanup and editing. You should get to grips with the photo editing tools built into your iPhone (and your iPad and Mac), because they’re really versatile and powerful. Here’s our guide.
Table of contents: Edit pictures on iPhone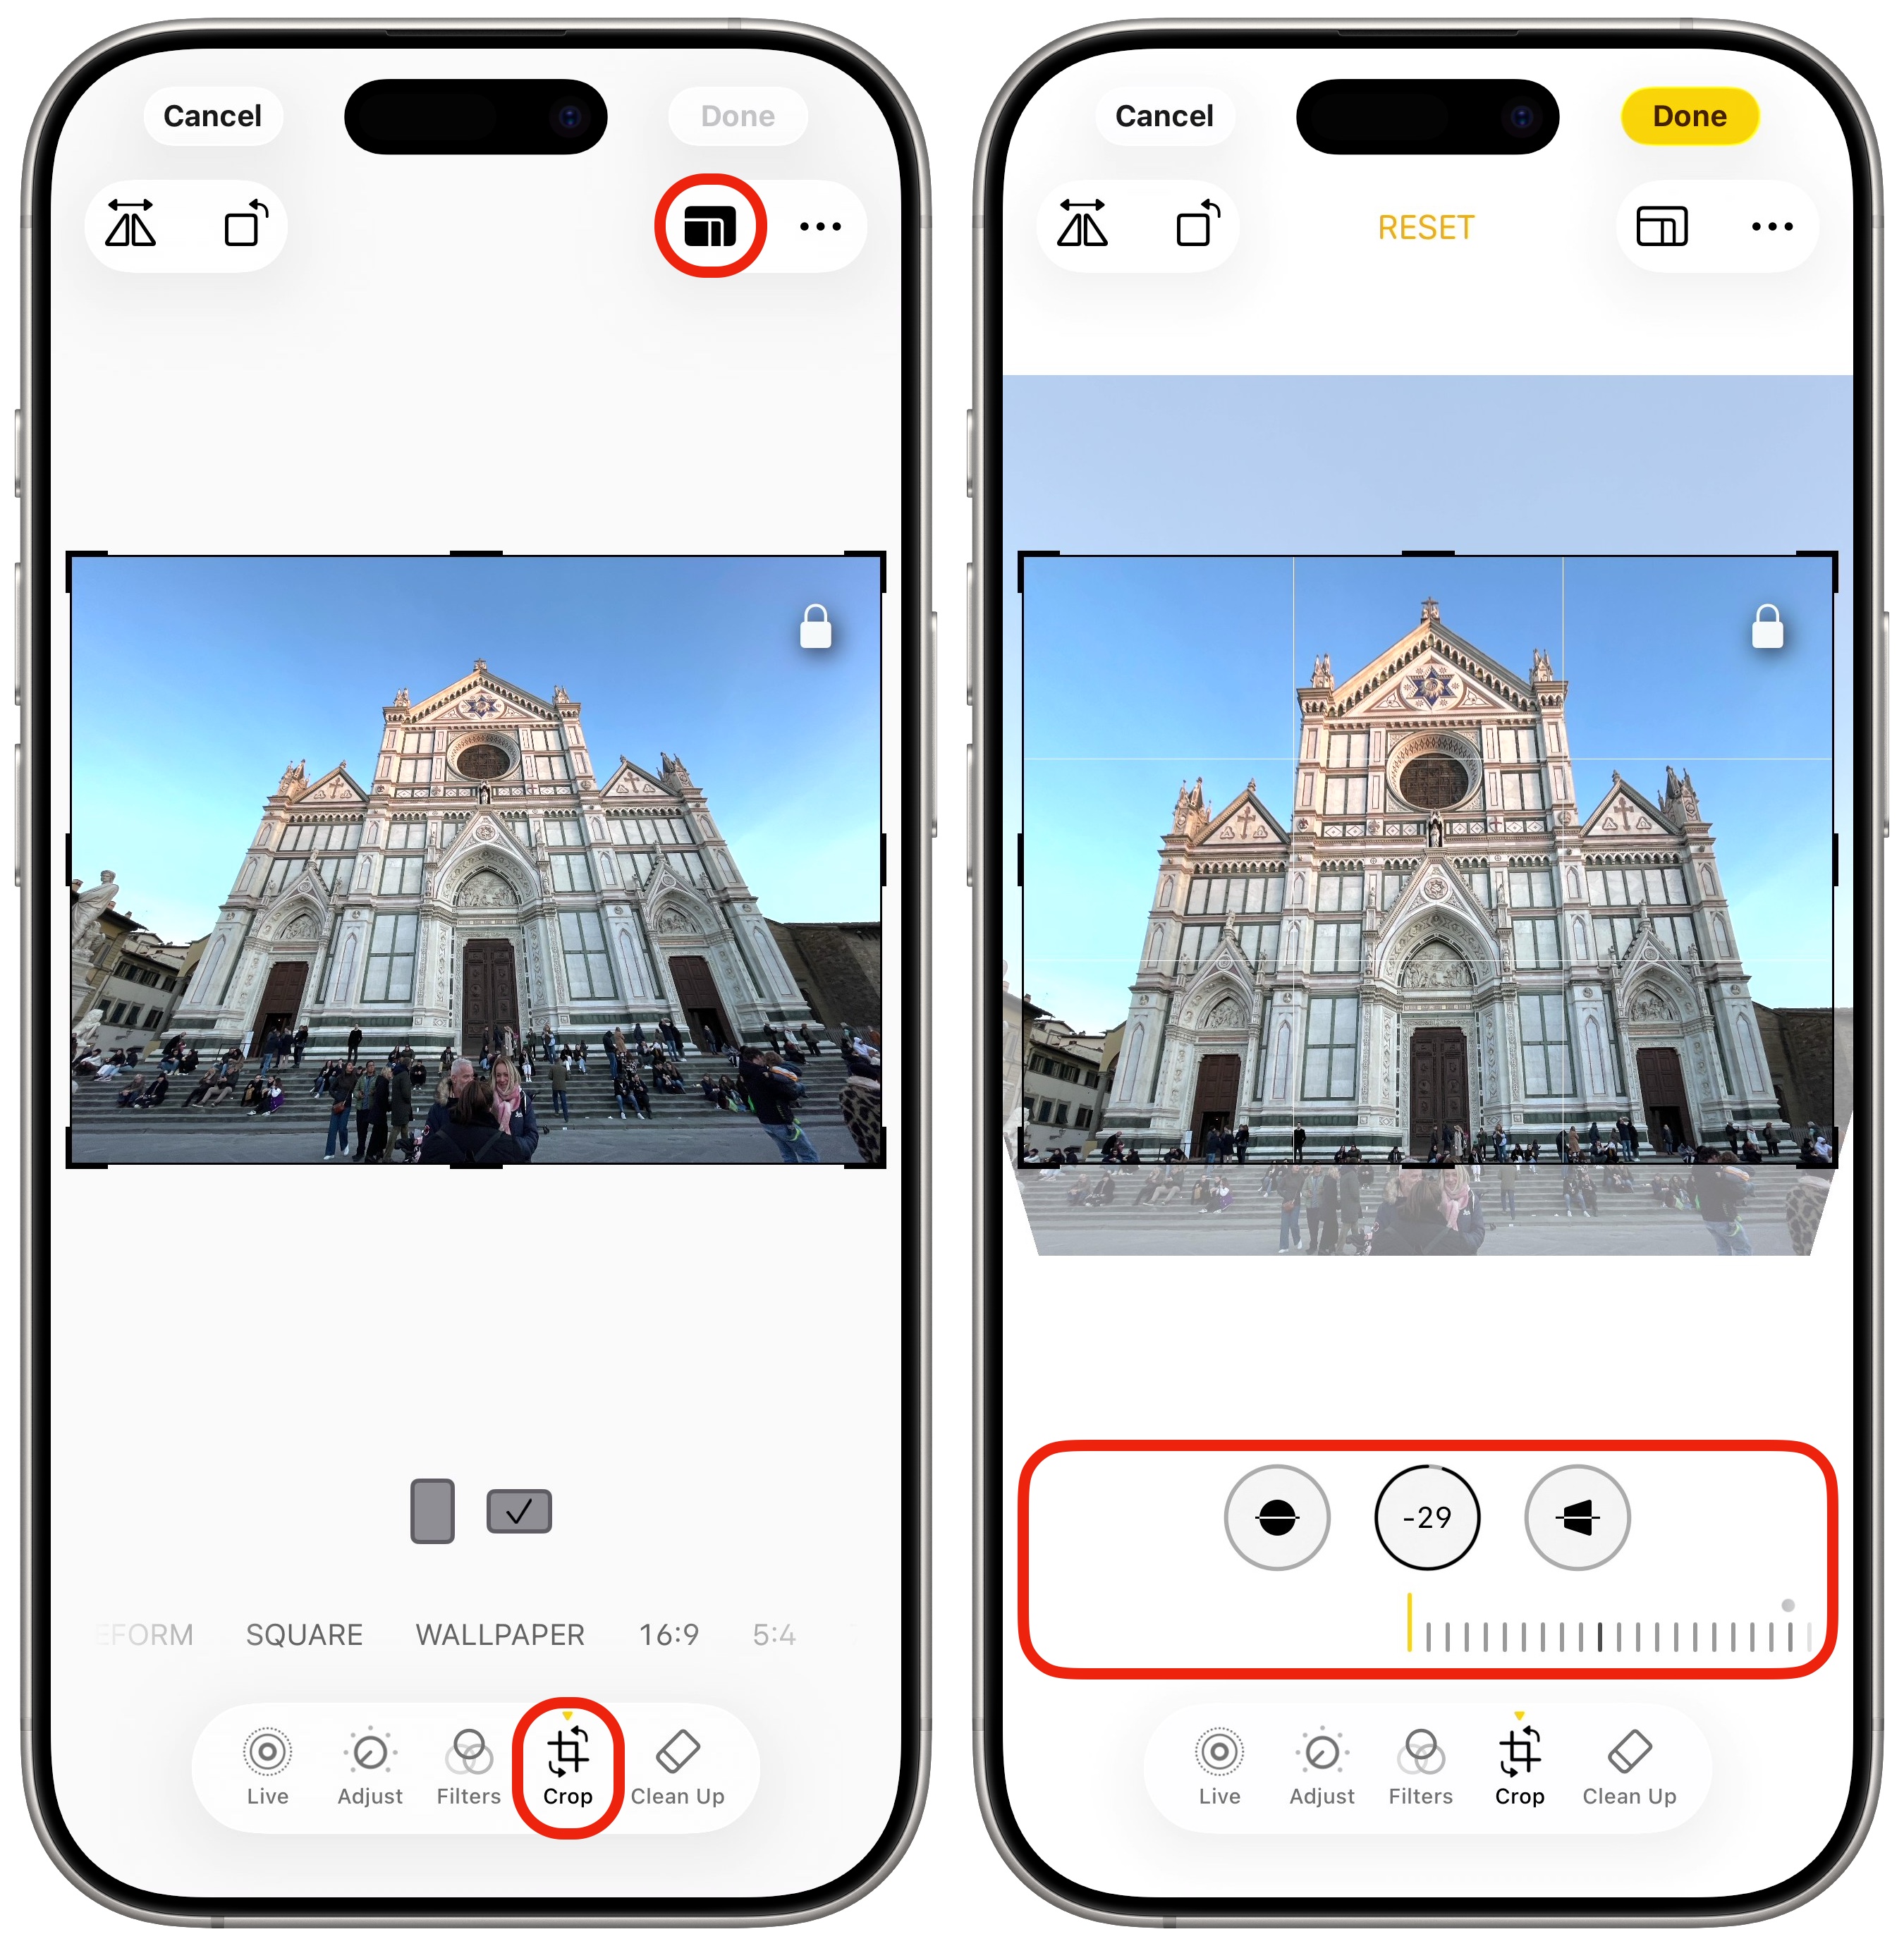 You can easily crop a photo to a particular aspect ratio and/or adjust the perspective.
If there’s something just peeking through the edge of a shot, you’ll want to crop it out. Maybe you spot a corner of a window or a bit of floor, barely visible on the edge of the picture, that looks distracting. Or, worse, you see the end of someone’s arm who didn’t know they were in the frame of your group photo.
You can fix problems like that with a quick crop. Just tap Edit (the button on the bottom in the center-right), then pick the Crop tool. You can use it to do multiple things:
From the Crop tool, you can also straighten the photo — maybe you took it in a rush, and it’s a little askew.
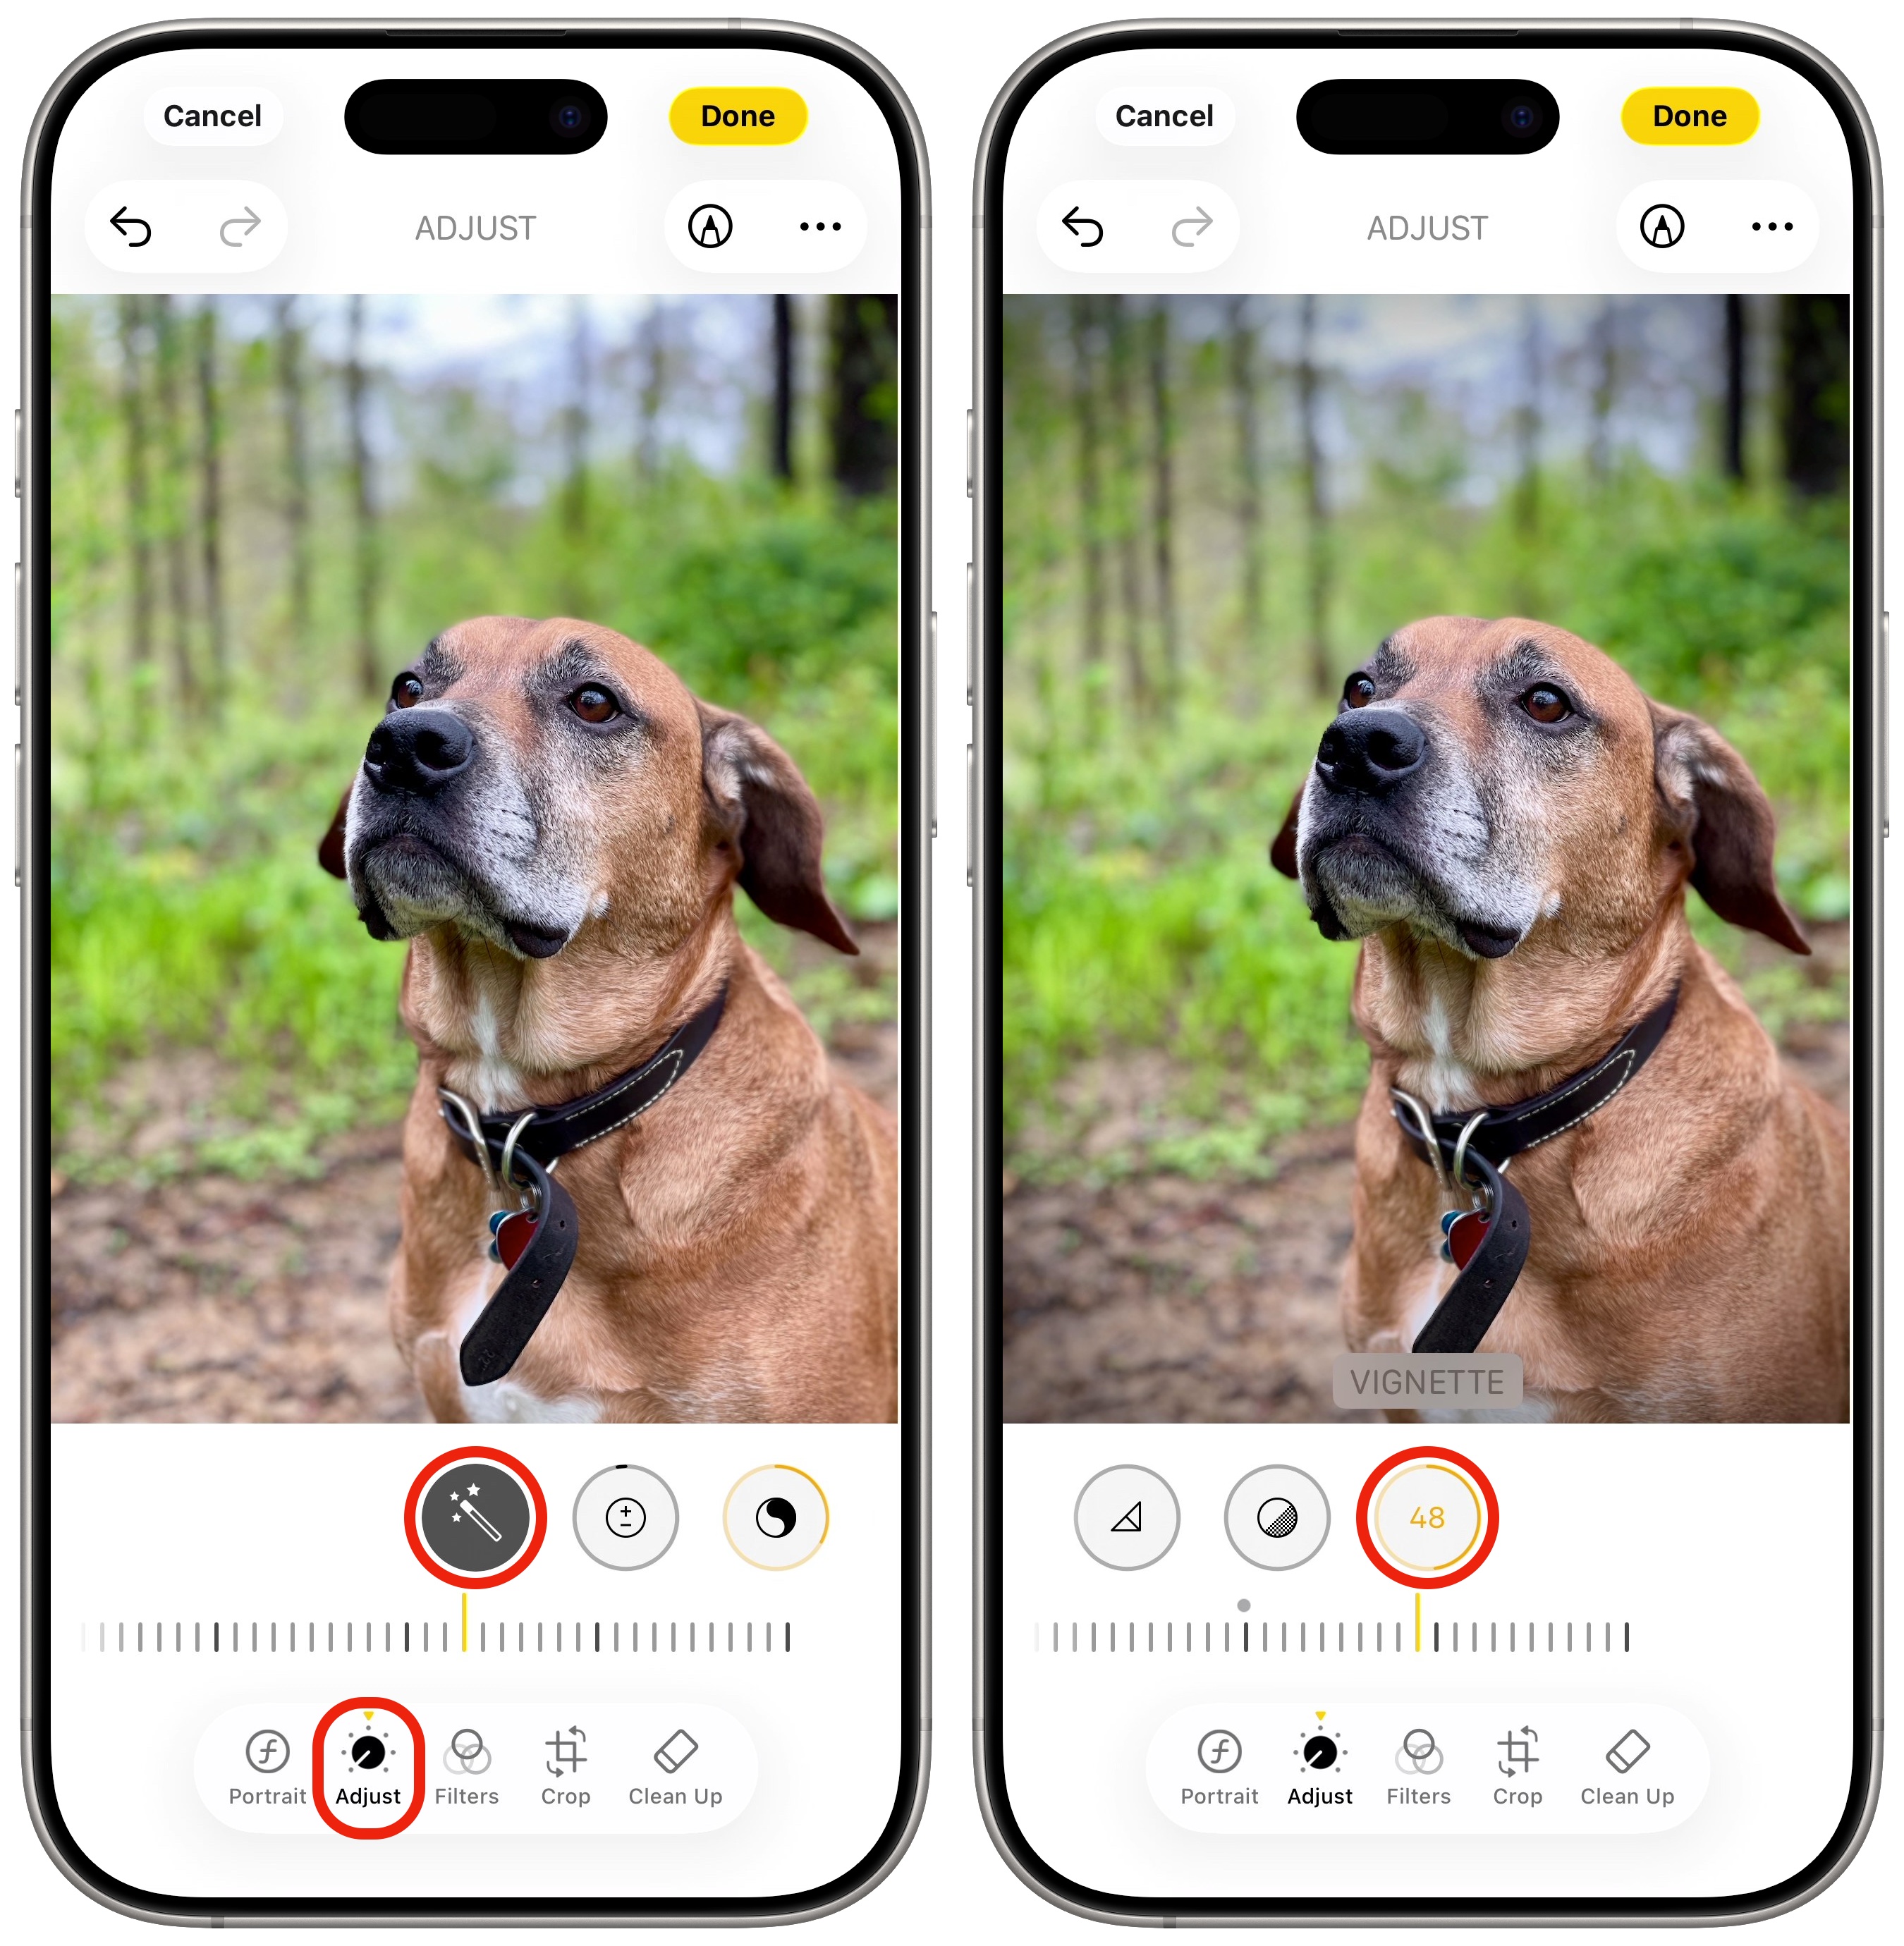 Enhance! Enhance!
And then there’s the overall look of the image, which you can also easily tweak. Tap the Adjust tab to edit the photo’s individual properties: exposure, brilliance, highlights, shadows, contrast, brightness, black point, saturation, vibrance, warmth, tint, sharpness, definition, noise reduction and vignette.
You can press the first setting, Auto, to automatically adjust all those sliders at once. This will instantly enhance the photo.
Then, if you want to make precise tweaks to the automatic adjustments, scroll through the list to see what changed. Often, I don’t need to make any extra changes. But I do like adding a subtle Vignette for especially artsy photos.
Edit the Live Photo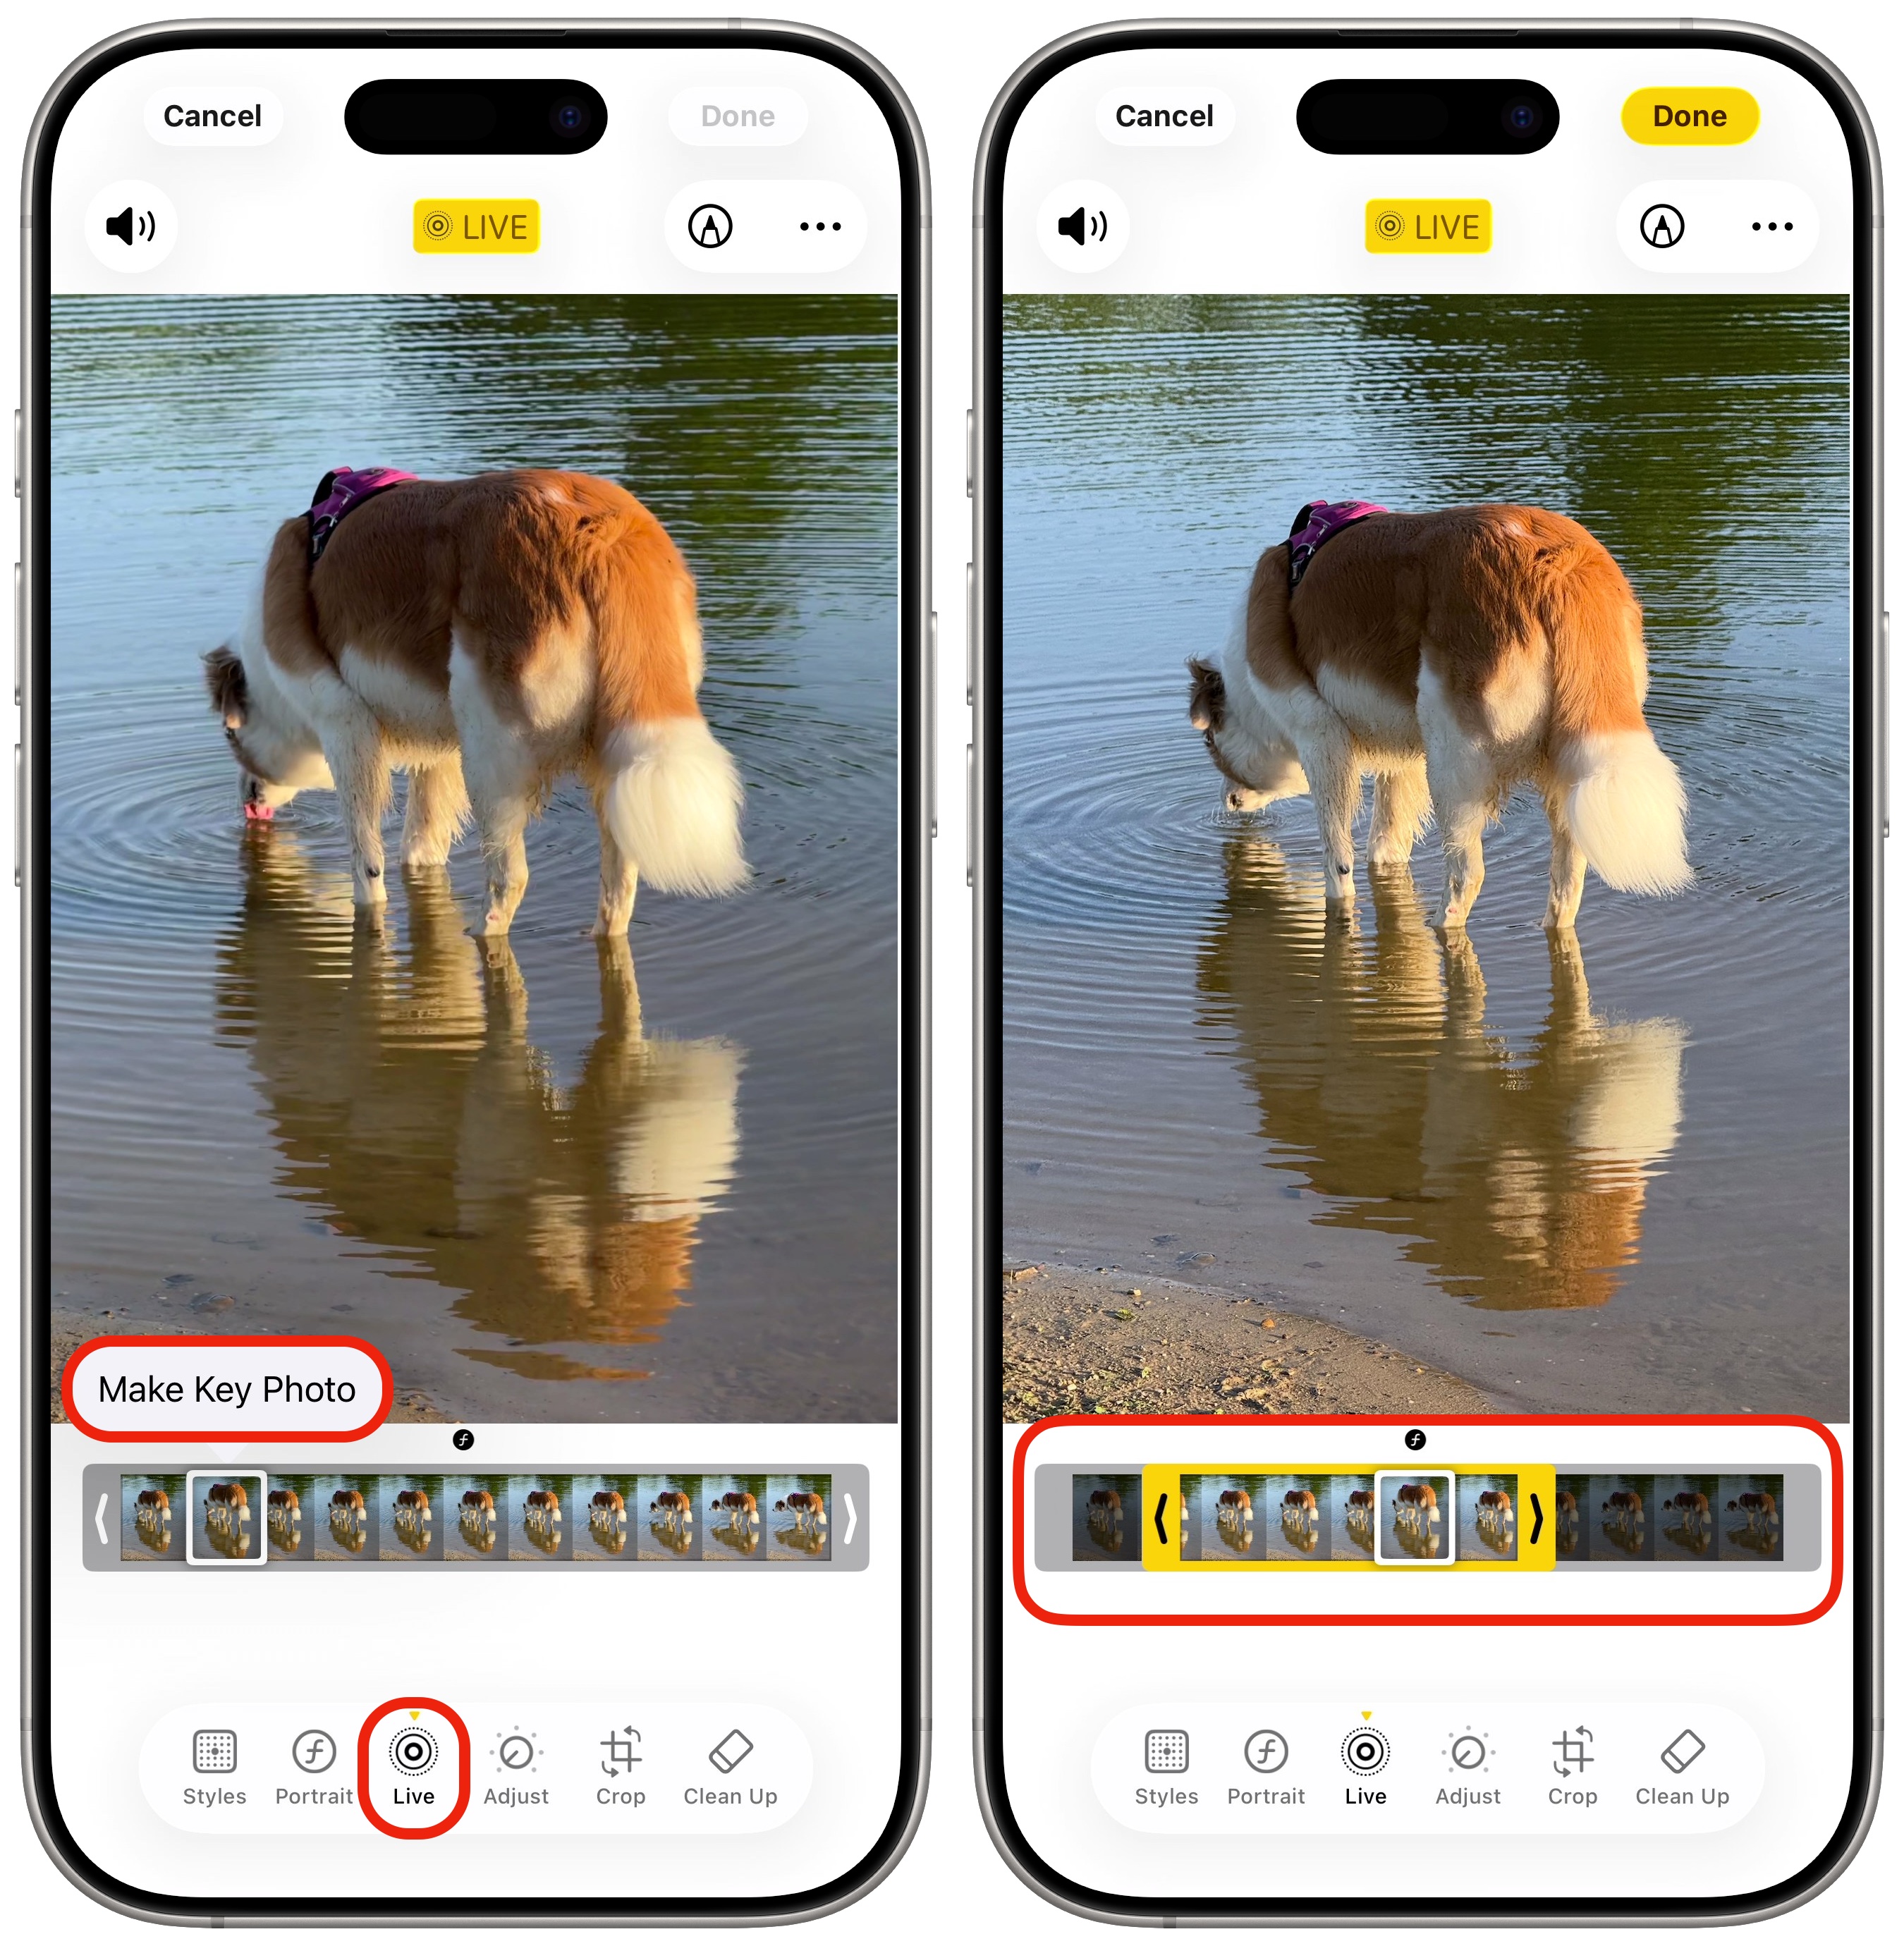 Pick a different picture out of the Live Photo — and trim the video down.
If you were a split second late hitting the shutter button, don’t worry. If you captured a Live Photo, you can pick a frame you like better. Live Photos take up more space than regular pics, but they capture several seconds before and after you hit the shutter.
You can also edit when the resulting short video begins and ends by trimming it down.
To make changes to a Live Photo, tap the Live tool at the bottom, then:
See also: Convert your iPhone’s Live Photos to video in seconds
Fine-tune the focal point and Portrait mode effect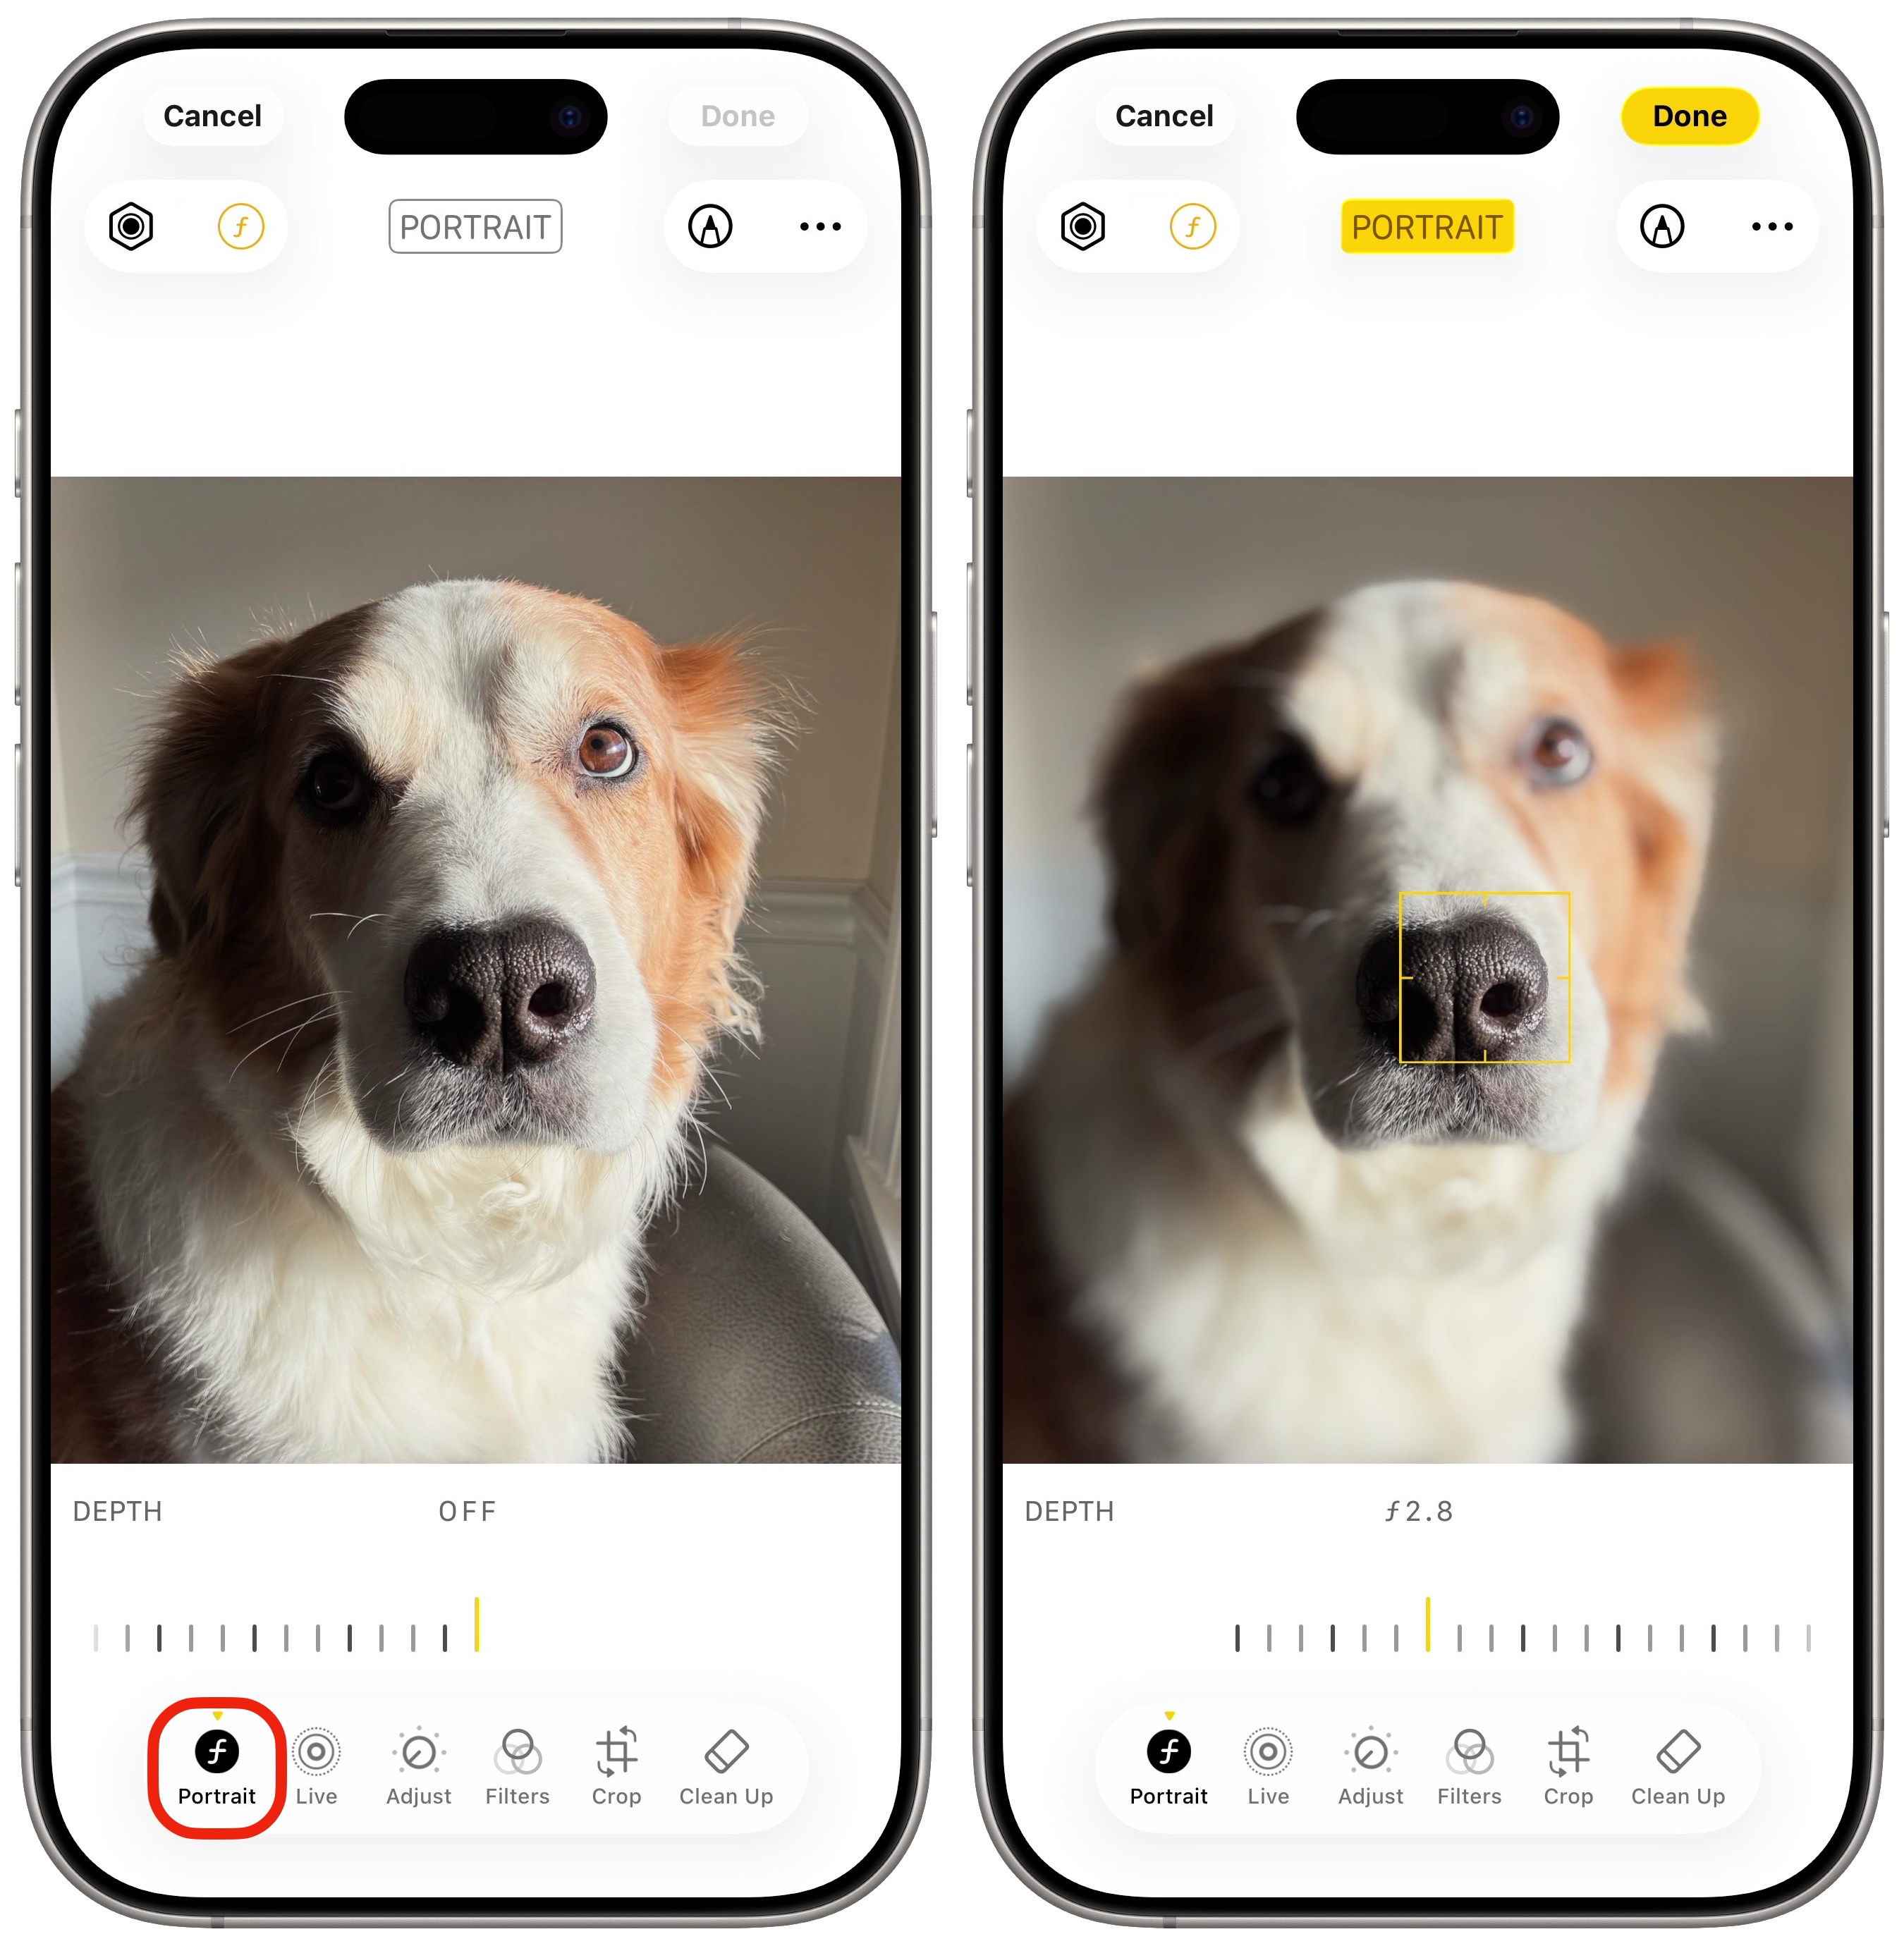 Change the focal point and make the blur blurrier.
The iPhone’s Portrait mode lets you capture images with a shallow depth of field, which can make your subject stand out from a pleasantly blurry background. It uses 3D depth data and computational wizardry to mimic the look of arty shots taken with DSLR cameras — and you can adjust that background blur after you capture the image. If the focus looks slightly off, you might be able to adjust that, too.
You can select Portrait mode before you shoot. And, if you took the photo with the rear camera of an iPhone 15 or later, you might be able to add a Portrait mode effect after the fact. Portrait mode automatically kicks in if the iPhone camera detects a subject, like a human face or a pet.
Plus, if you tap the screen to focus on a particular part of an image — which you probably should do anyway, if you want your photos to look sharp — that also engages Portrait mode. (Look for the tiny f-stop icon when you’re lining up your shot.)
If you see the Portrait tool available when you go to edit a picture on your iPhone, tap it to make adjustments.
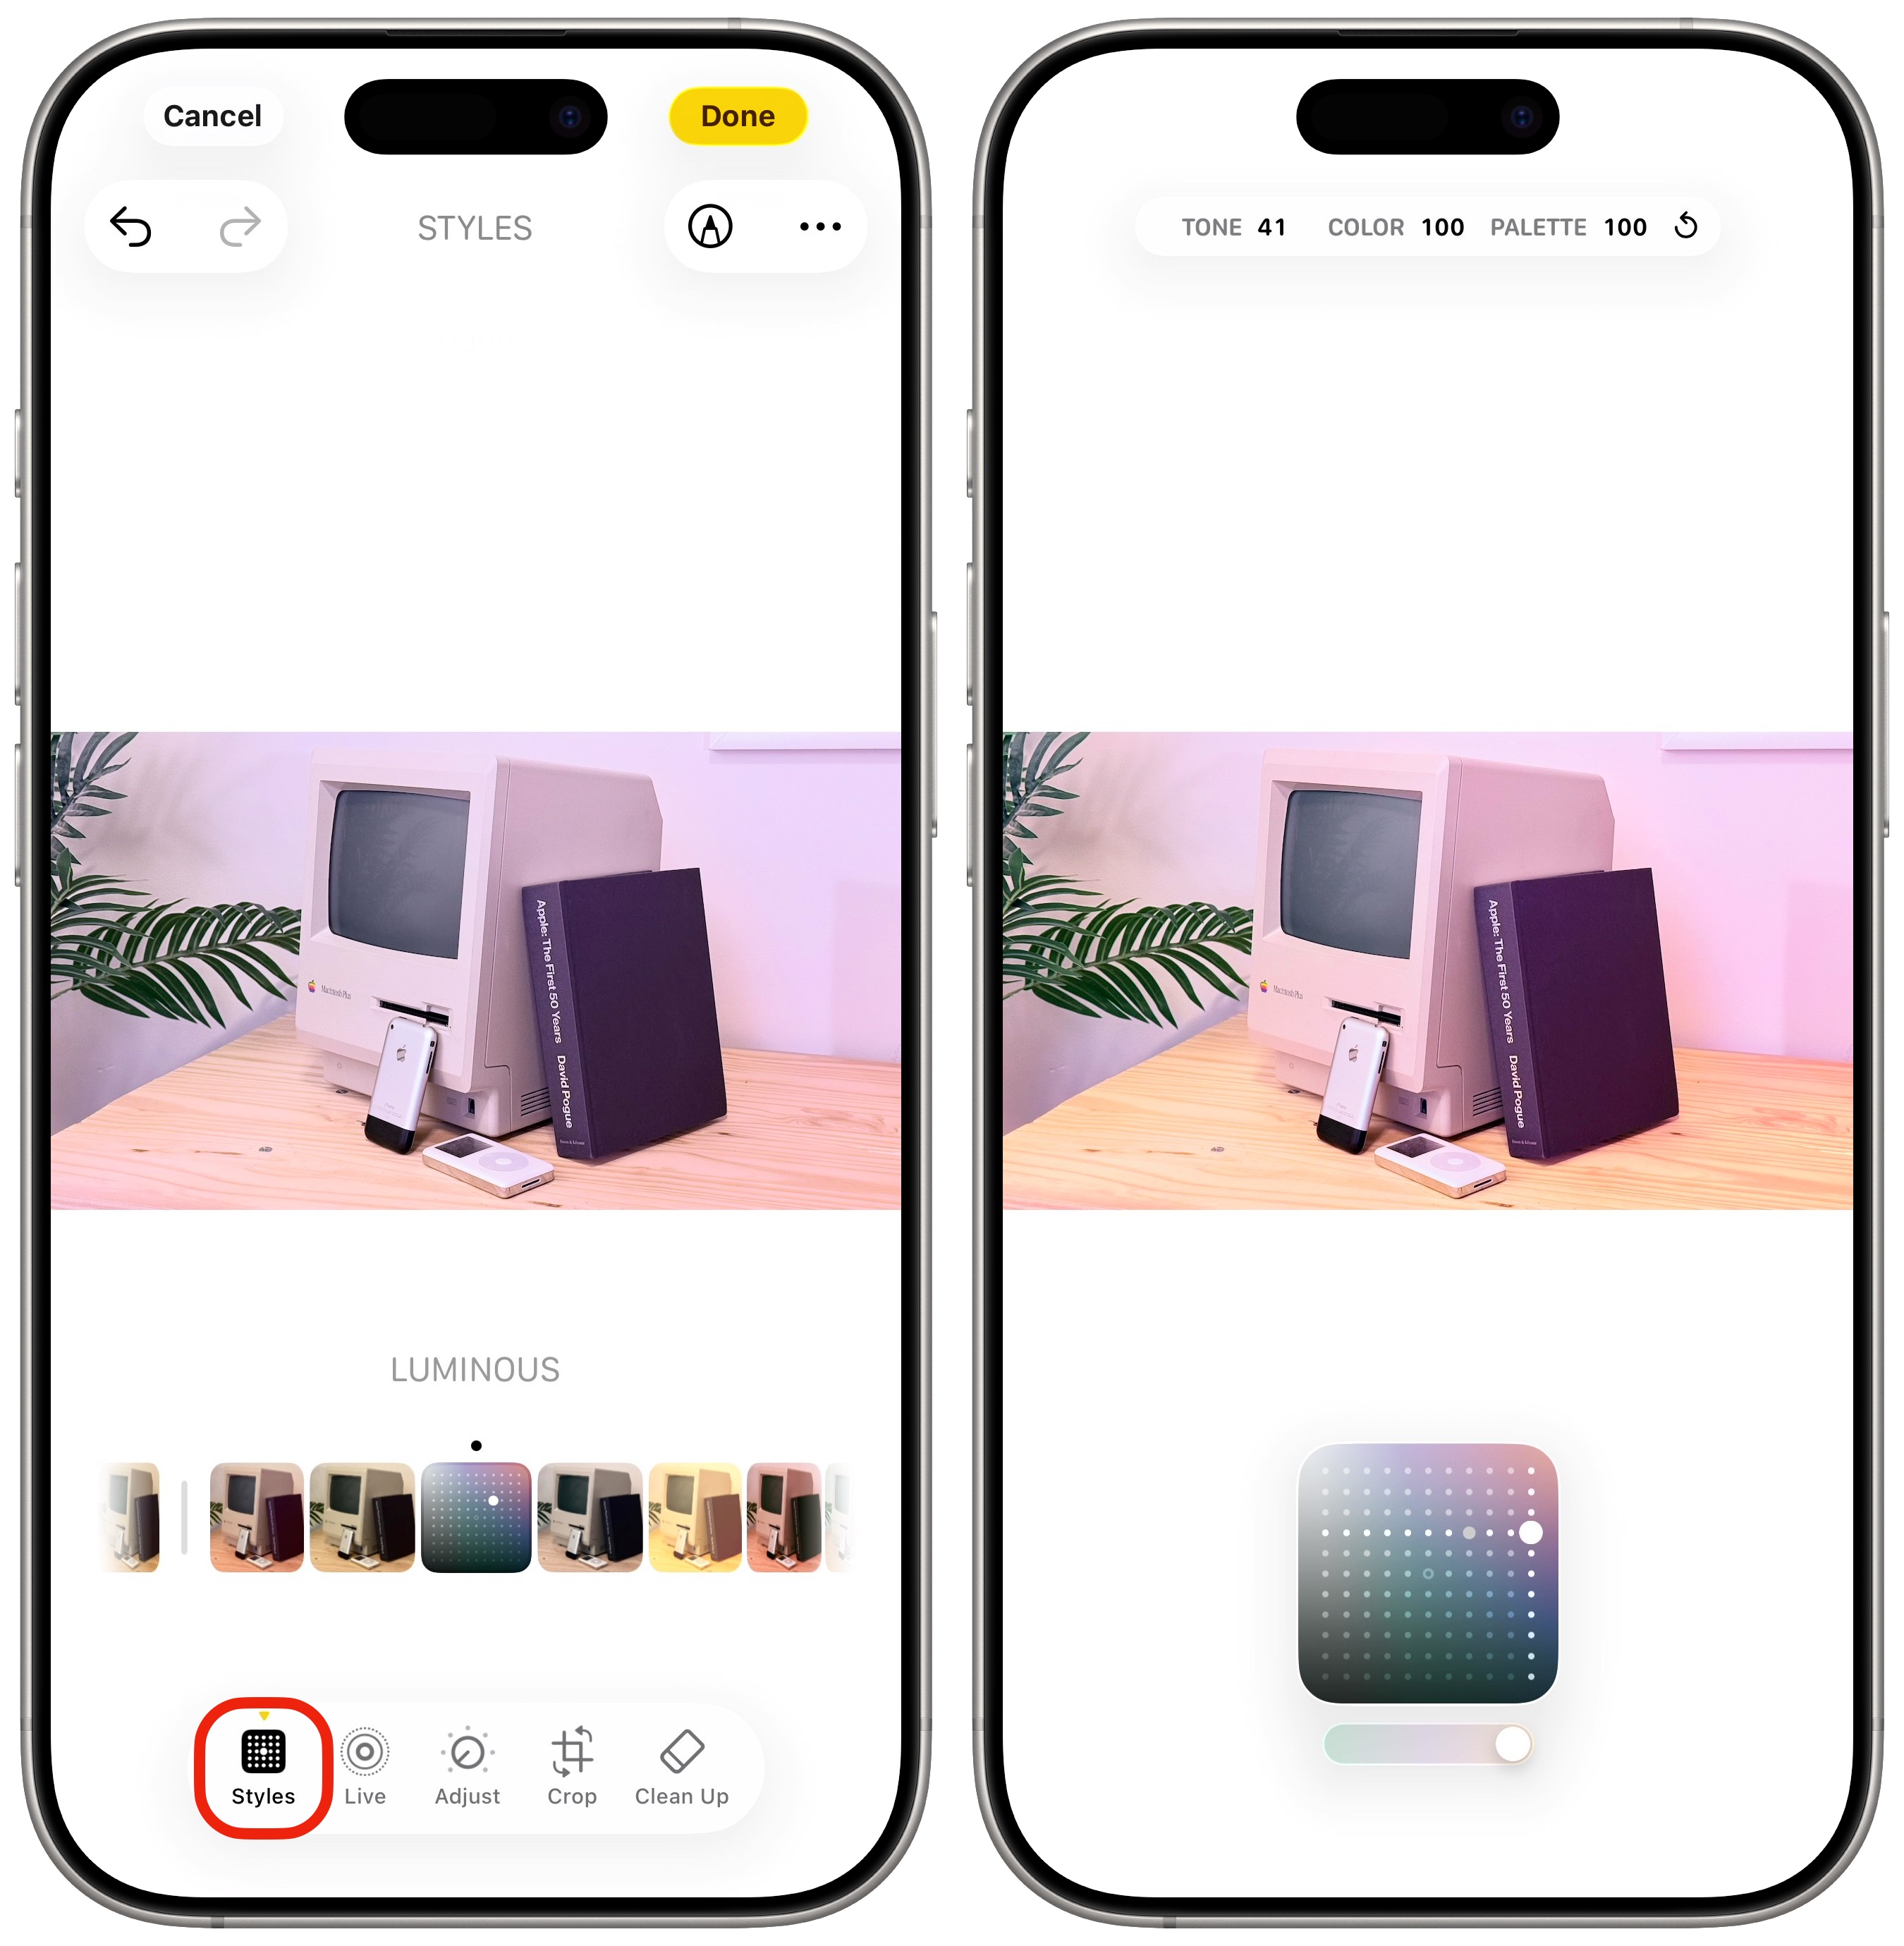 Photographic Styles are much more powerful than filters.
If you took the photo with an iPhone 16 or later (except for the iPhone 16e and iPhone 17e), you can adjust the Photographic Style as well. Photographic Styles use extra camera sensor data stored alongside the picture to change how the color looks and feels. It’s like switching between specific types of film with different properties.
This is an extremely easy way to edit pictures on an iPhone and make them look eye-catching. Tap the Styles tool and scroll through the options to the right: Vibrant, Luminous, Dramatic, Quiet, Cozy, Ethereal, Muted Black & White and Stark Black & White.
Then, you can tweak them even further. Tap on the colorful square under the style’s name to fine-tune the color. Dragging up and down affects the brightness and contrast; dragging left and right affects the color and saturation. The extra slider on the bottom makes the image warmer or cooler.
Edit things out of the picture with Image Clean Up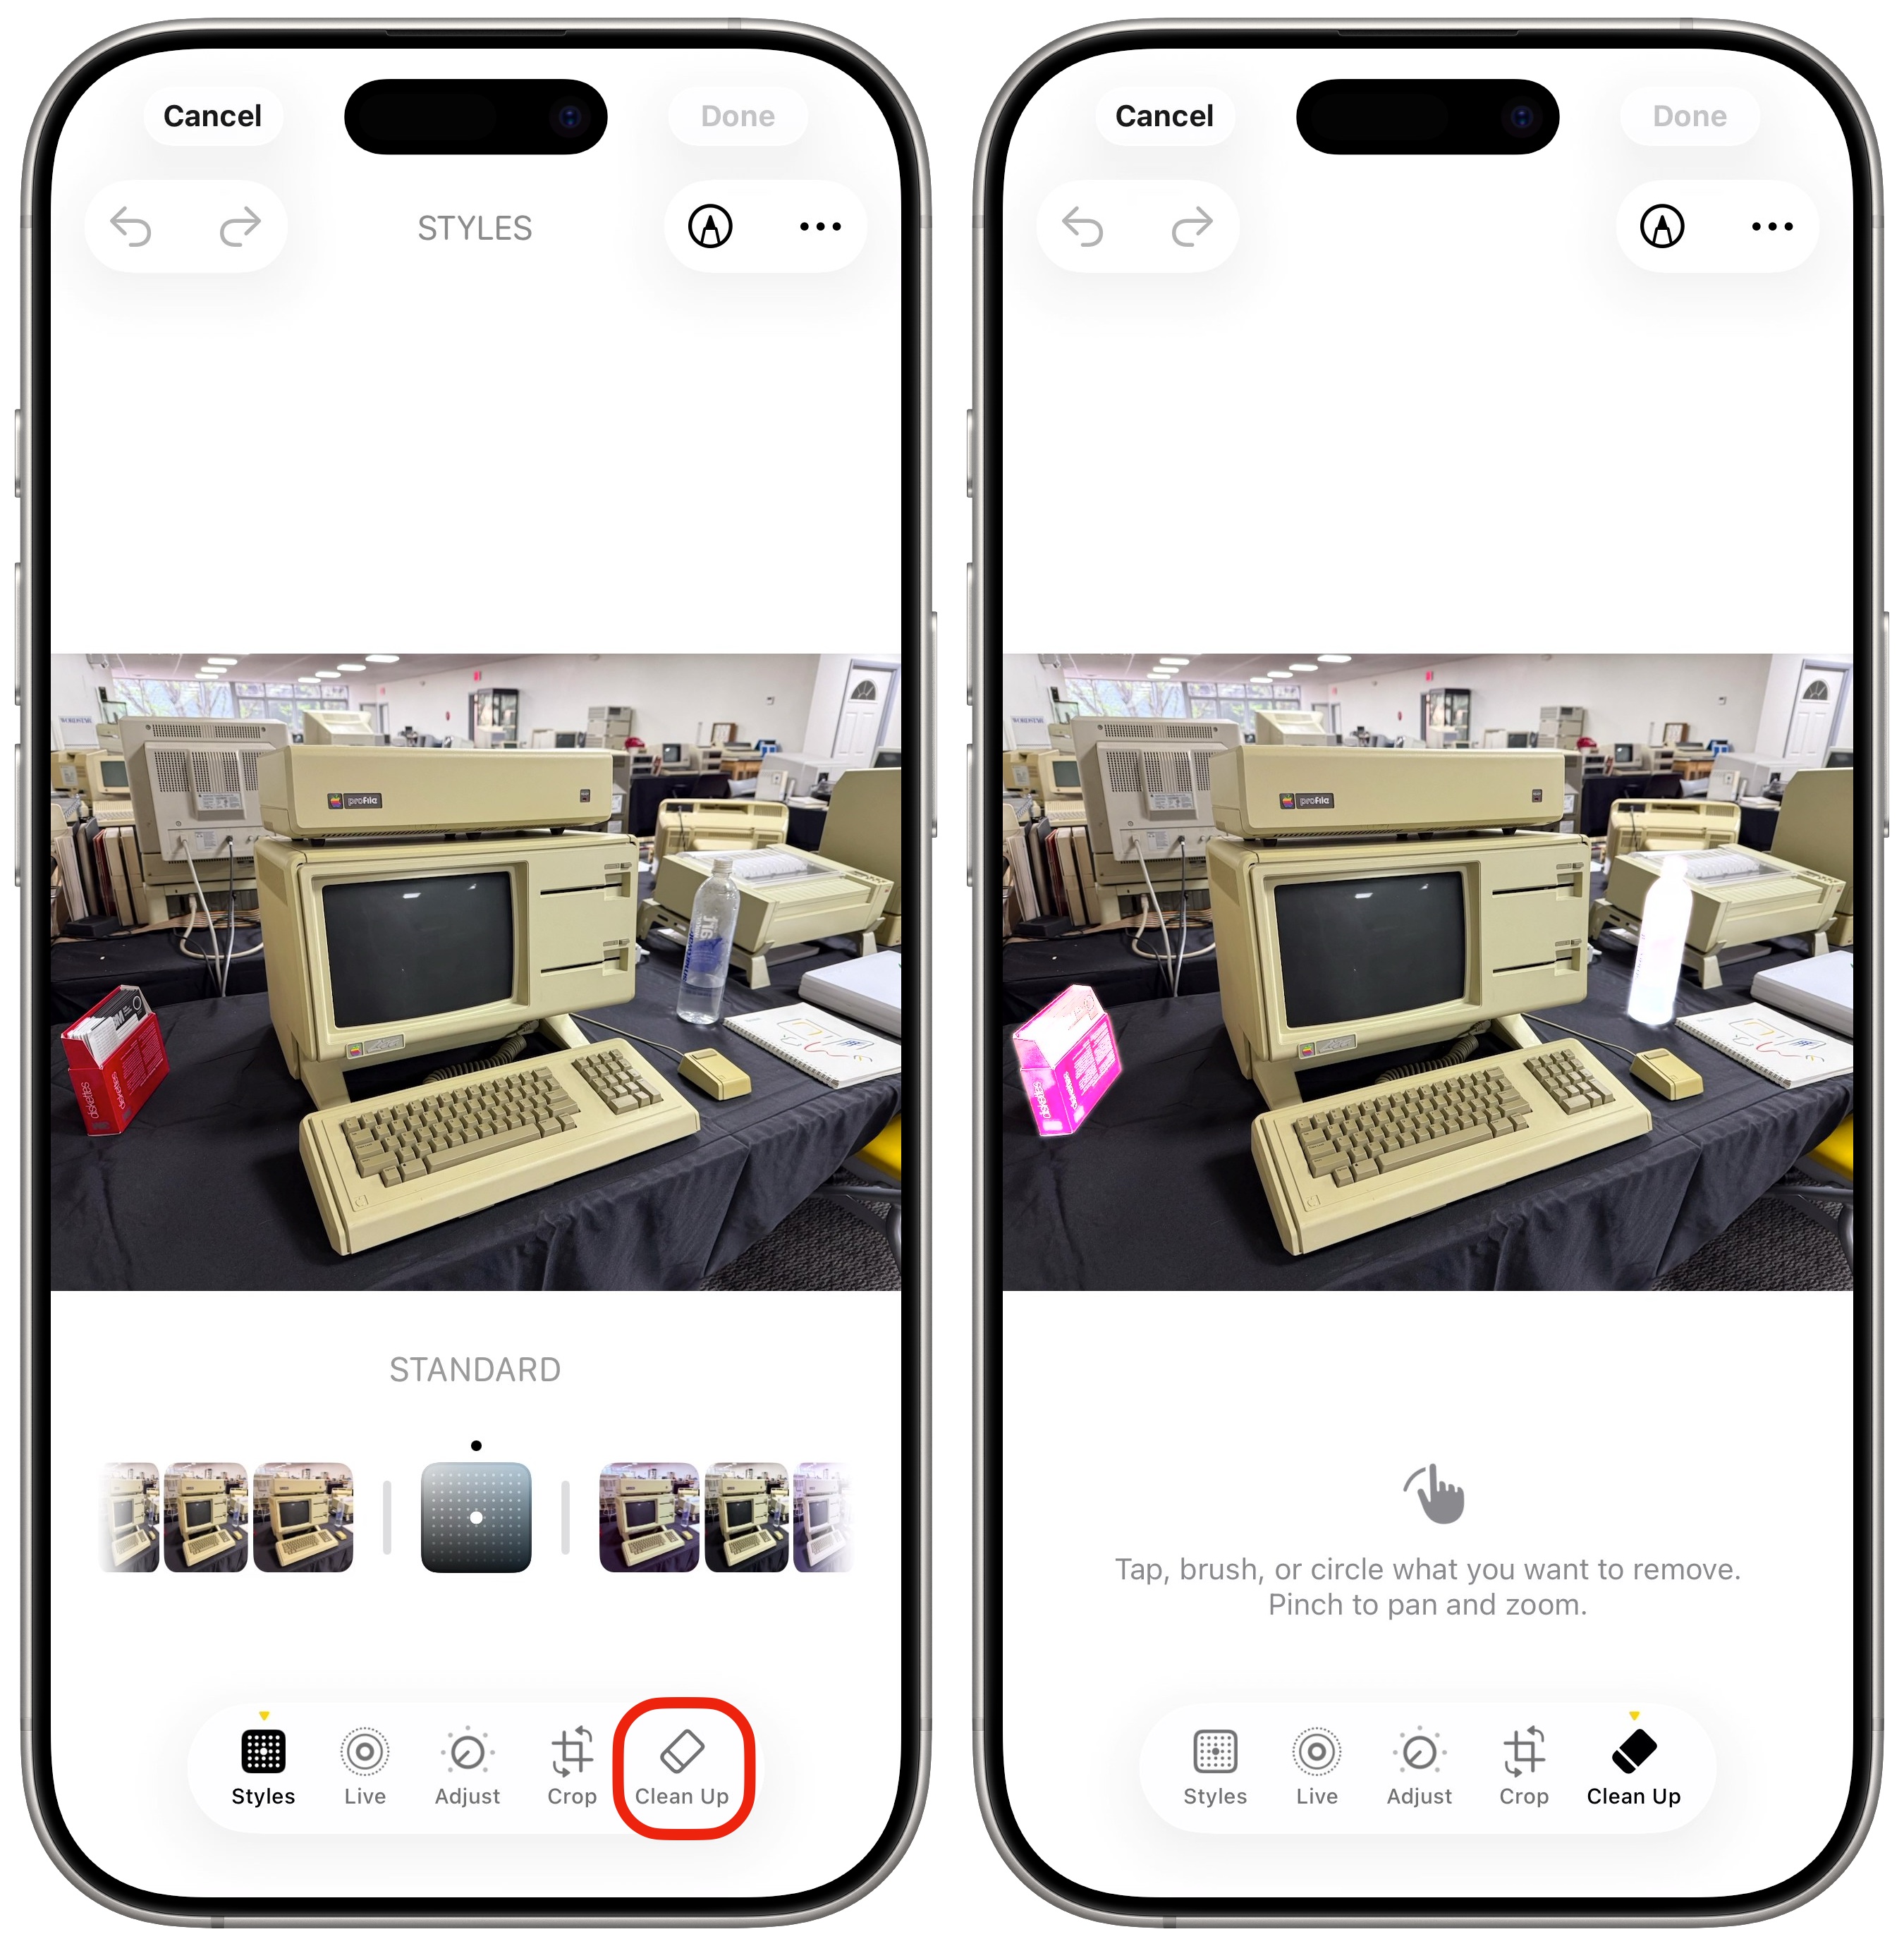 Just tap one of the highlighted objects in the photo to remove it.
If you use an iPhone that supports Apple Intelligence, you can use the Clean Up tool to remove things from the picture. I use this feature all the time to remove dust and hair from product photos.
The Clean Up tool will automatically highlight things it thinks you might want to remove. Just tap to remove them. You can also drag your finger to select or circle something to remove.
To read more about the Clean Up tool, check out our article: “How to remove an object from a photo with Apple Intelligence.”
Copy and paste edits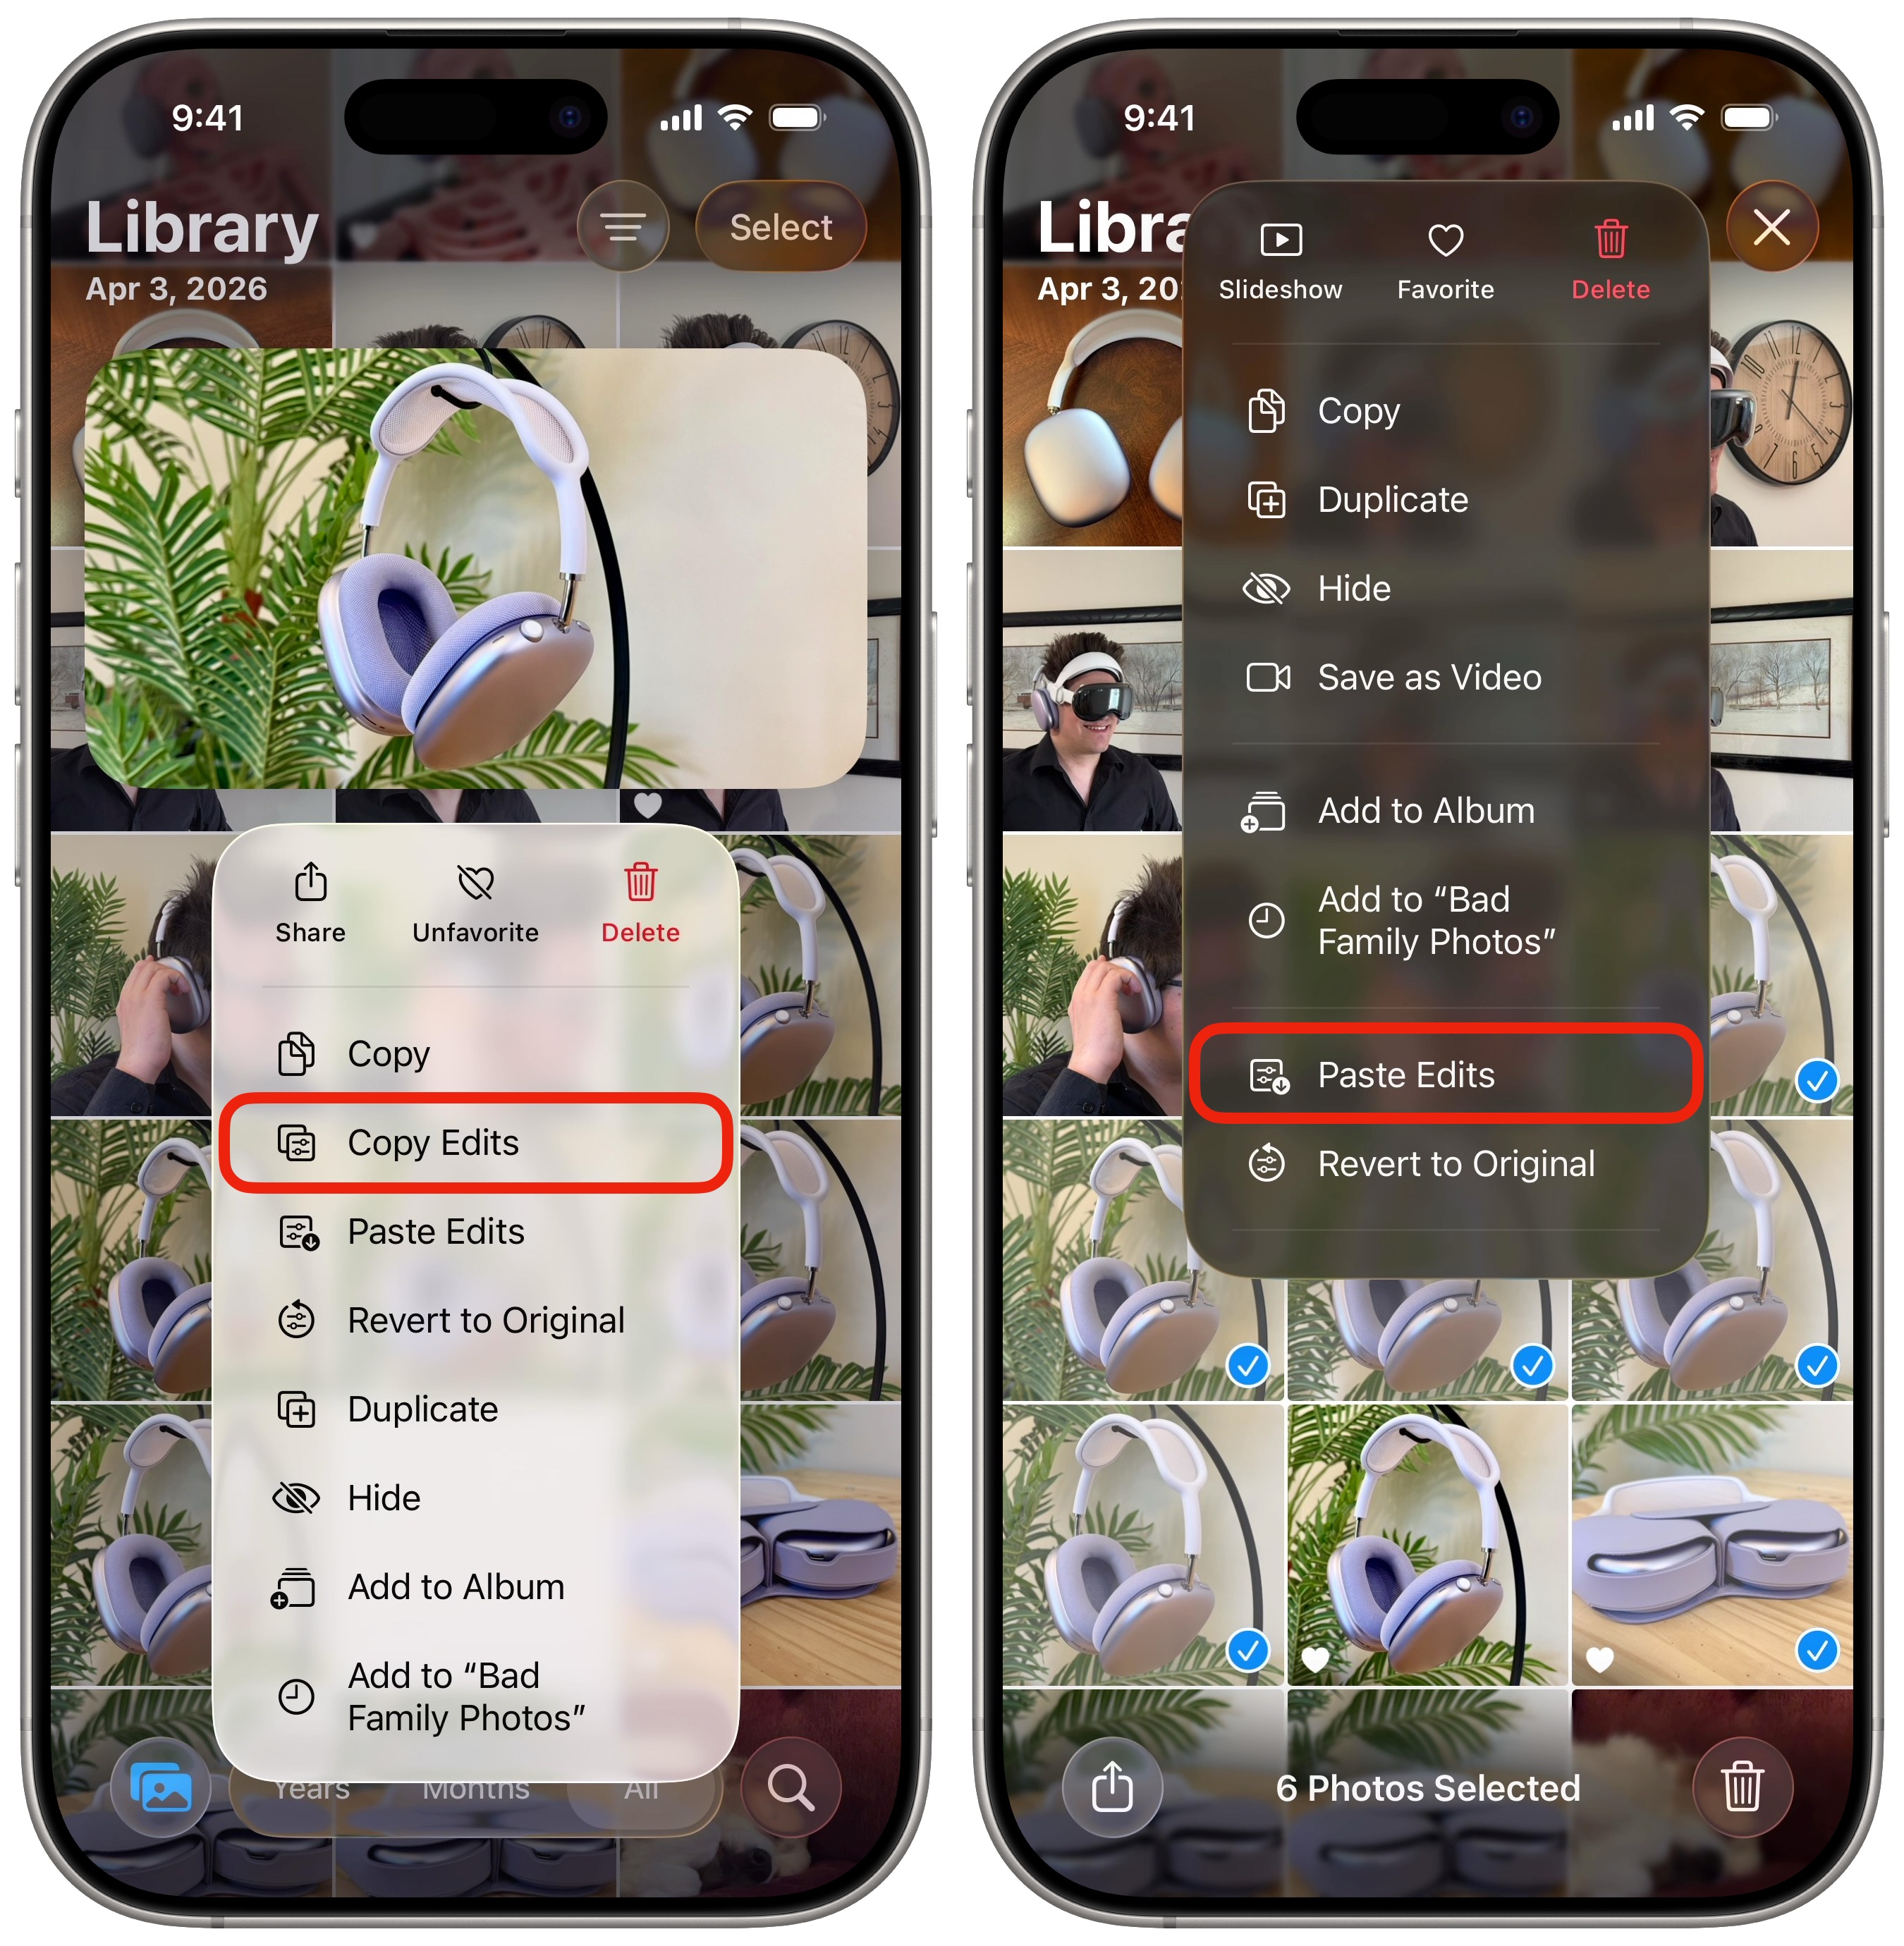 Do the work in bulk.
After you spend a few minutes perfecting your favorite photo, you probably don’t want to do all the same work over and over again on every other picture in the set. Luckily, you can copy and paste the edits you made on your iPhone to other pictures
Go back to the Photos app’s image grid, then tap and hold on an edited photo and tap Copy Edits. Select the edits you want to carry over and tap Done. Then tap Select, and drag your finger across the grid to select a bunch of photos at once. Tap More, then tap Paste Edits to apply your tweaks to all the images.
More tips for managing your photo libraryNow that you know how to edit pictures on your iPhone, why not learn some more tricks?
| # | Наименование новости | Тональность | Информативность | Дата публикации |
|---|---|---|---|---|
| 1 | 5 tips for natural-looking, lo-fi pictures on your iPhone | 0 | 30.33 | 26-05-2026 |
| 2 | How to remove an object from a photo with Apple Intelligence | 0 | 20.8 | 28-04-2026 |
| 3 | Tons of new features in Photos help sort your massive library in iOS 27 | 6 | 6 | 30-06-2026 |
| 4 | Fed up with iPhone autocorrect? Here’s how to reset it. | 0 | 20 | 10-05-2026 |
| 5 | Easy way to record and transcribe your iPhone calls | 0 | 18.38 | 27-04-2026 |
| 6 | My top 3 tips for making an iPhone Home Screen that doesn’t suck | 0 | 22.53 | 09-05-2026 |
| 7 | How to take fabulous fireworks photos with your iPhone | 5 | 5 | 03-07-2026 |
| 8 | 5 ways the Camera in iOS 27 is more refined than ever | 5 | 5 | 03-07-2026 |
| 9 | How you can stop the endless madness of iPhone notifications | 0 | 26.24 | 14-05-2026 |
| 10 | 5 overlooked Mac features that save me time every day | 0 | 26.69 | 01-08-2026 |